Background Information #
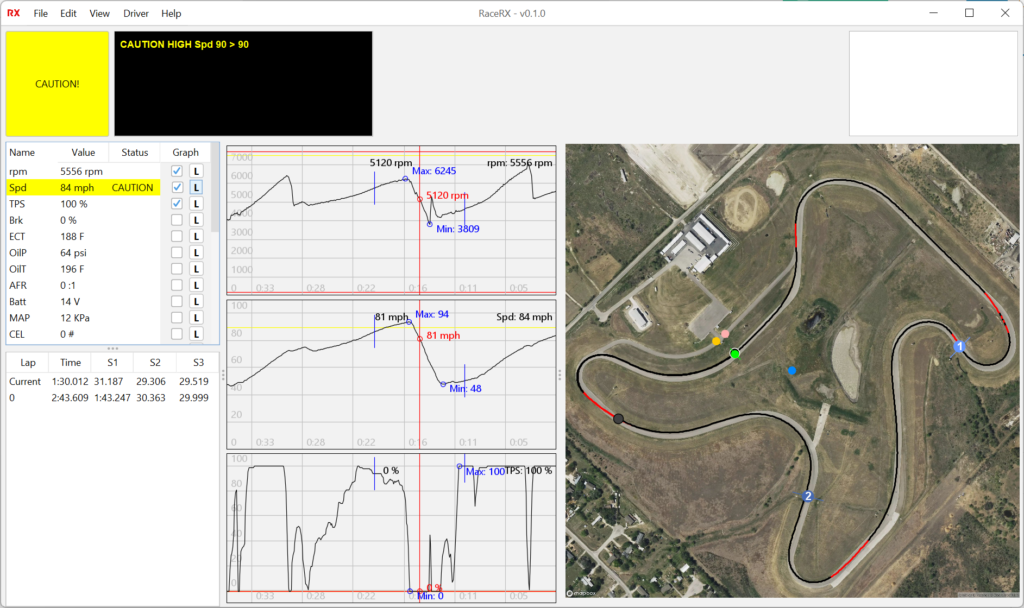
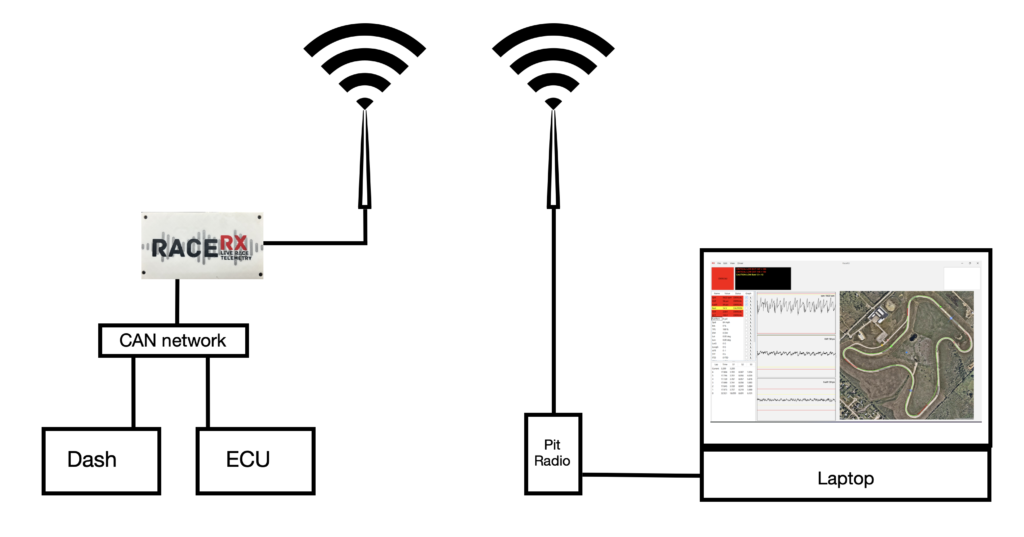
RacerRX is a grassroots car telemetry system tailored for budget racers. It features a car unit that communicates with the CAN outputs from your dash, ECU, and CAN-enabled sensor modules. This data is transmitted to the Crew Chief software on your laptop in the pits, providing your crew chief and pit crew with a comprehensive overview of the car’s status, location, and performance during races.
Packing List #
- RaceRX Car Unit: The main telemetry device.
- Car Antenna: Ensures strong communication signals.
- USB-C Cable: Connects pit radio to your computer.
- CAN/Power connector plug: 8 pin connector to connect to car power and the CAN network.
- Pit Radio: Allows communication with the pit crew.
- Pit Antenna and mounting bracket: Receives the signal from the car.
- SMA Extension Cables: Extends the reach of your antenna setup in the car and pits.
- Crew Chief software: Use the supplied link to download the software.
Common Usages #
The RaceRX system is versatile and can be integrated into almost any racing vehicle, particularly beneficial in scenarios such as:
- Endurance Racing: For prolonged monitoring of vehicle performance.
- Spec Racing: Ideal for one-make series like Spec Miata.
- Club Racing: Enhances team strategy and vehicle monitoring in amateur races.
- HPDE Events: Useful for driver education days to track progress and vehicle condition.
Diagrams #
Installing the Crew Chief Software #
Go HERE for instructions on installing the Crew Chief software on your computer.
Setting up the car unit and antenna #
Car antenna location #
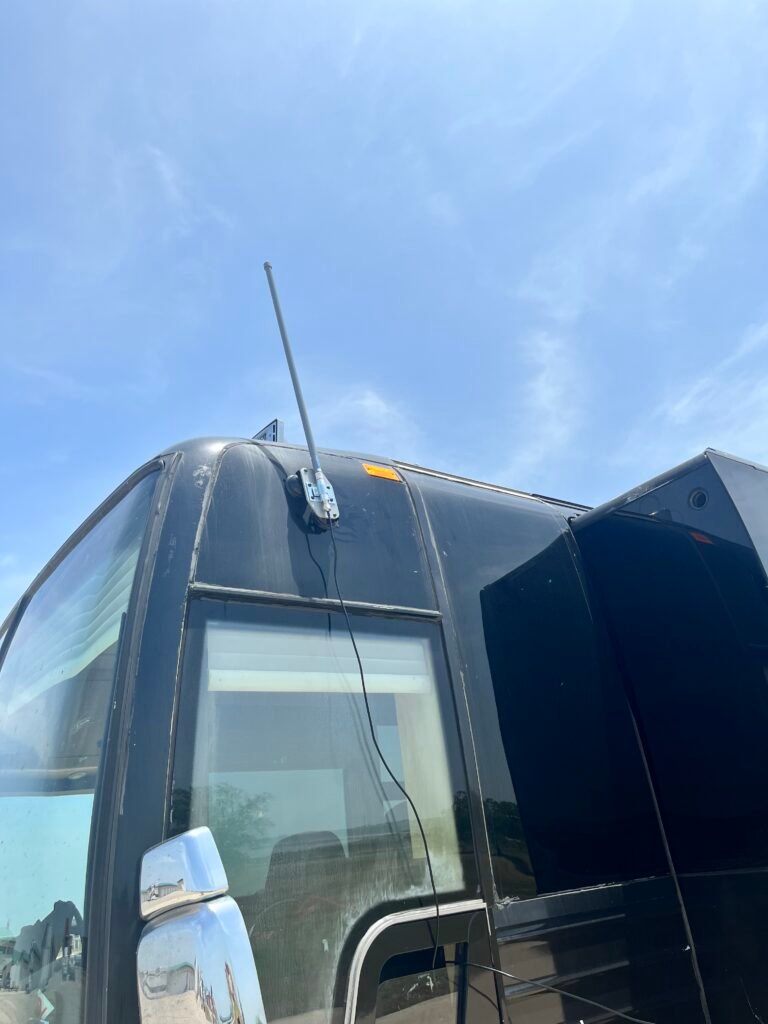
The best place to mount your car antenna is in the middle of the roof. You can also make a bracket to mount the antenna above the passenger side window. If you have a Flagtronics unit, try not to mount the RaceRX antenna in the same plane as the Flagtronics unit. They will interfere with each other. Since the Flagtronics unit is usually mounted on the dash inside the car, placing the RaceRX antenna on the roof will eliminate interference. Use the shortest possible cable to connect it to the car unit without straining it. If you have a metal roof, our magnetic base antenna is a good choice.
Mounting the car unit #
Use the supplied mount to mount the unit in a convenient location within reach of the driver. Also mount it in a location to keep it out of any moisture that might enter the car.
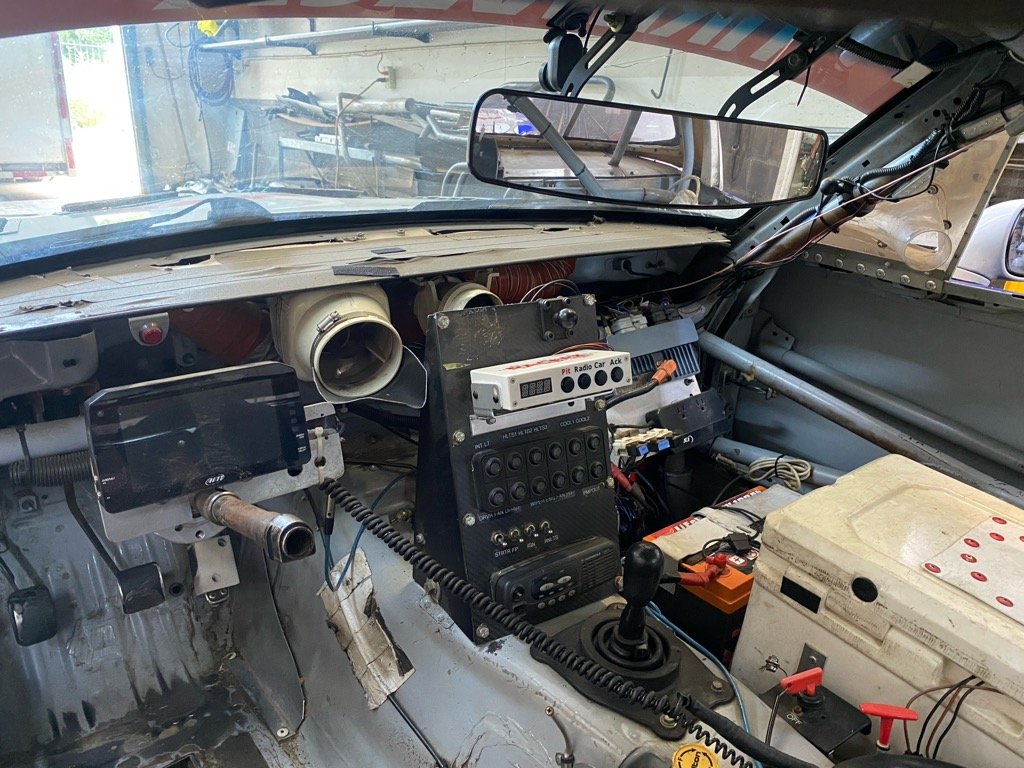
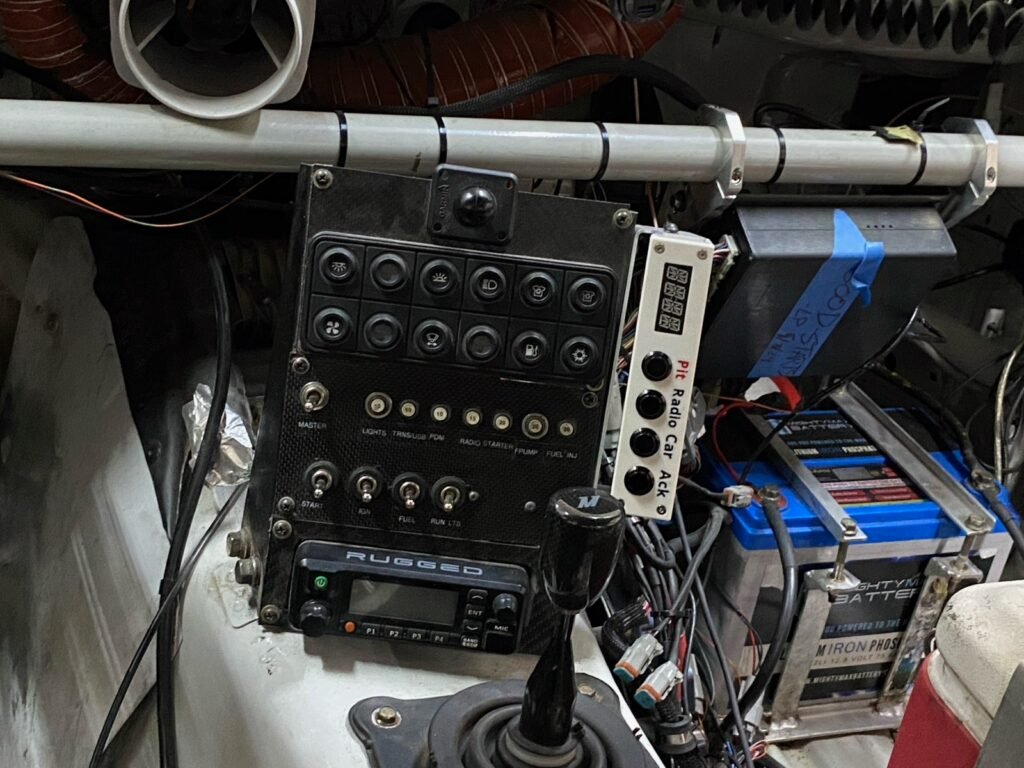
Wiring the car unit #
Below is a picture of the connectors on the back of the car unit.
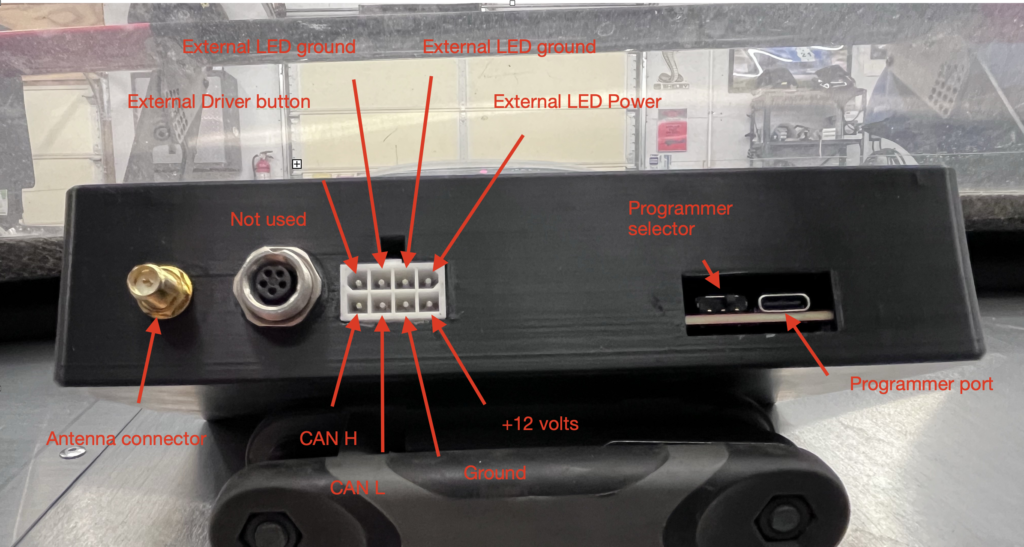
8 pin connector #
- +12 volts: connect through a 5 amp fuse to the car’s 12 volt source.
- Grounds: connect to chassis ground.
- CANL and CANH: connect with a twist wire pair to the car’s CAN network
- External LED: can be connected to a external LED. Is triggered with the “pit now” command from Crew Chief
- External button: can be used for a steering button
5 pin AIM connector #
To be removed
Antenna connections #
These are SMA connections for the connecting the car antenna. Use the supplied coax cable.
Pairing the radios #
Once you have the Crew Chief software installed on your computer and you are signed into your account, you need to pair all of your radios so they work together. They come from the factory with default settings but you want to set them up so that they use a unique channel associated with your license. This prevents any interference from other teams using RaceRX at the same track.
Pit Radio #
First, connect your pit radio to a USB-C port on your computer. Then in the Crew Chief software go to: Config > Radio > Connect. In the Comport drop down menu look for your connect radio (********). Select it then click “Reconnect”, then “OK”. This connects your radio to Crew Chief.
Then navigate to: Config > Radio > Configuration. After a couple of seconds you will see a warning that the connected radio is not a team radio. That is ok, we are about to make it your team radio. Select “Pit Radio” from the drop down menu and click pair. After a few seconds you will see you are connected to the pit radio under the Status section and picture of a computer and RaceRX radio.
Car Radio #
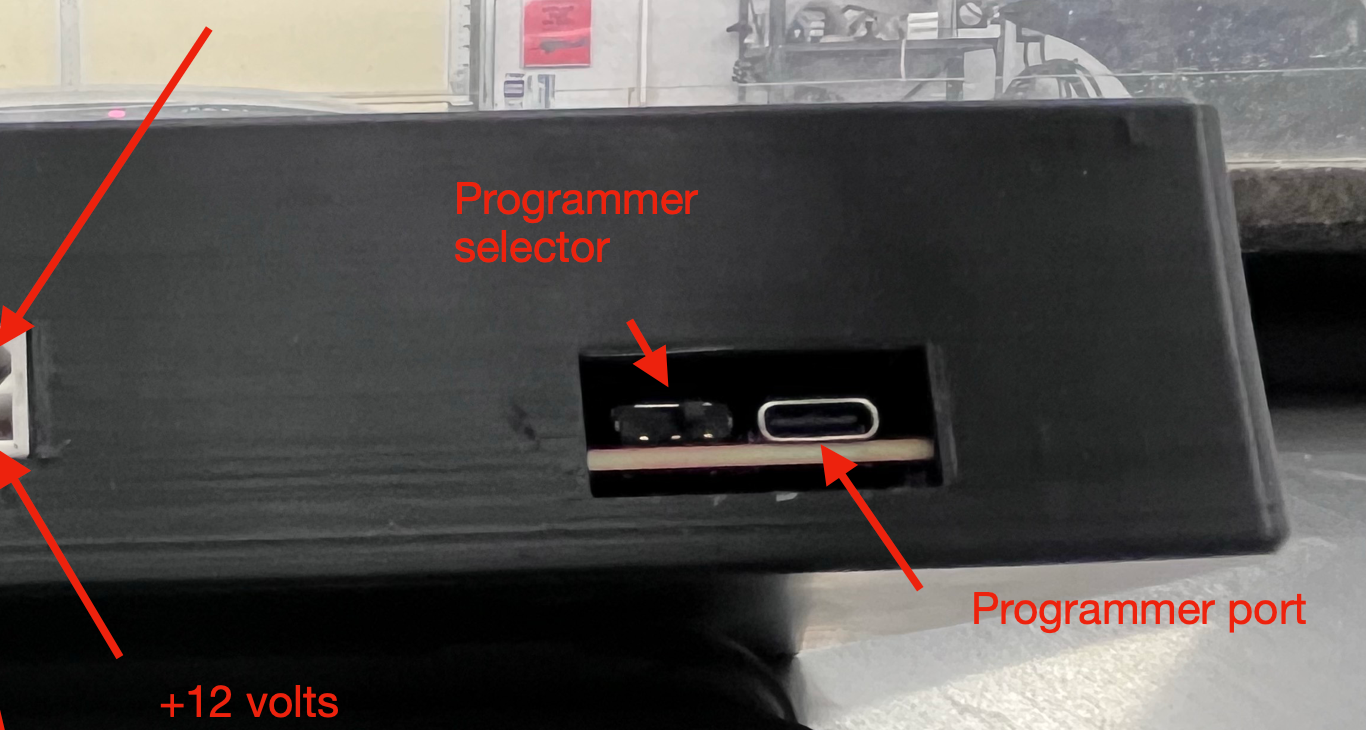
Pairing the car radio is a similar process. Before plugging it into the computer USB port slide the Programmer selector to the left (see the picture above). Plug it into the computer and follow the steps outlined above for the pit radio (Connect, then Configuration). Instead this time select “Car radio” from the drop down menu before clicking the “Pair” button. Once you disconnect the car unit from your computer it is VERY important that you slide the program selector back to the right. If you don’t do this you will not be able to read any data from your car.
Extender Radios #
If you have any extender radios follow the same steps as the pit radio, except select extender in the drop down menu before clicking the pair button.
Setting up the Pits #
Pit Antenna Location #
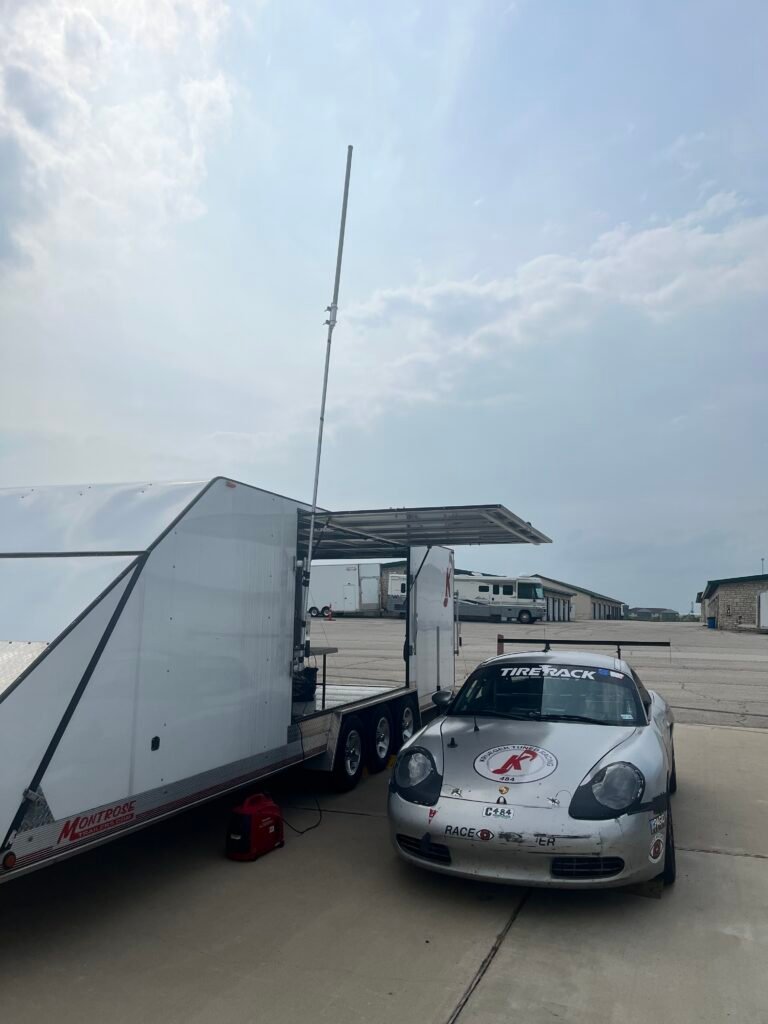
The pit antenna includes a mounting bracket that can be attached to the provided mast or one of your choosing. For optimal performance, the mast should be positioned at the highest point possible with a clear view of the track. Common mounting locations include the top of a pit awning leg or the side of a trailer.
Since the radios operate on a line-of-sight basis, ensuring a clear view of the track will help prevent data dropouts. Try to avoid placing the pit antenna where buildings or large groups of trees obstruct the line of sight between the antenna and the track.
The pit radio can be connected to one or two antennas, and it will automatically select the one with the strongest signal. For areas of the track with poor reception using an omni-directional antenna, you can connect a second directional antenna to the pit radio and aim it at those specific points.
If you have extra cable between the antenna and the radio, avoid coiling it, as this can degrade the radio signal.