Upon launching Crew Chief for the first time, you will need to either load an existing CAN message configuration or create a new one. We provide default preset config files for common setups with AIM dashes, AIM Smarty cams, and Megasquirt ECUs. If using these setups, simply load the relevant .rcan files.
Load a Car Configuration #
- Navigate to
Edit > Car Config > Load Car Configin the menu bar. - A window displaying the RaceRx Config folder will appear.
- Locate the
.rcanfile you wish to use and selectLoad Config. - Once loaded, this configuration will auto-load on subsequent program starts.
Creating and Editing a Car Configuration #
- Go to
Edit > Car Config > Car Configurator. - To create a new config file, select
File > New. UseFile > Opento edit an existing file or open a template.

Adding and Configuring CAN IDs #
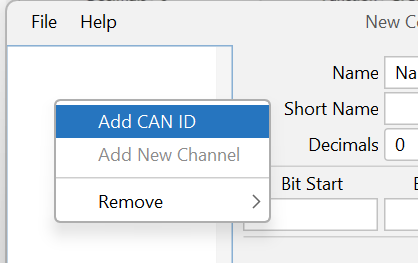
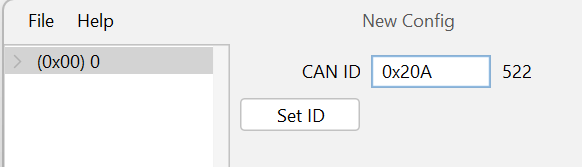
- Right-click in the CAN ID window and select “Add CAN ID” to insert a new ID into the list.
- Select the new CAN ID, then enter the required CAN ID in either decimal or hexadecimal format (for hex prefix with ‘0x’).
- Click “Set ID” to save and update the CAN ID list.
Adding and Editing Channels #
- To add a channel that is associated to a CAN ID: Right-click the CAN ID and select
"Add New Channel“. - Navigate to the new channel and click to open the channel edit view.
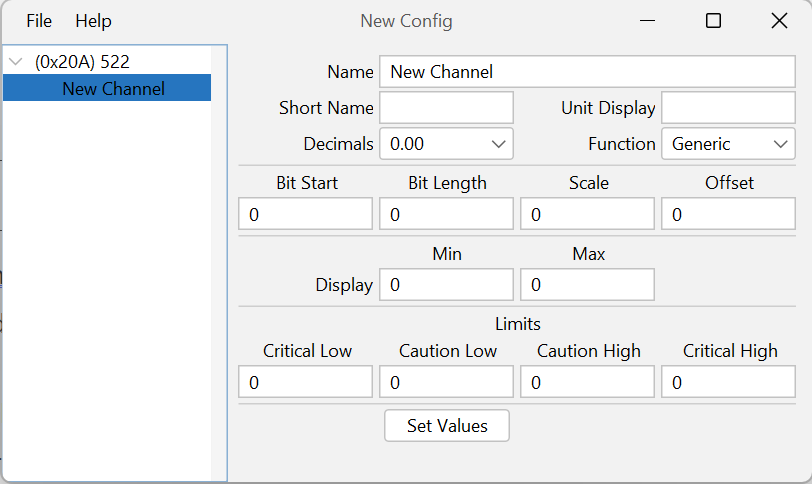
In the channel configuration, enter:
- Name: E.g., Engine Coolant Temperature
- Short Name: E.g., ECT (choose a name within 5 characters or less)
- Units: E.g., Fahrenheit (F)
- Decimal Places: Choose based on the precision needed (e.g., 0 for temperature, 2 for G-forces)
- Function: Select from the list of functions that best matches the channel you are creating. For example use the RPM function if this channel is displaying RPM data from the ECU, or use GPSLat is the channel is displaying Latitude data from the dash. Function is REQUIRED for GPS longitude and latitude (GPSLon and GPSLat) as well as any other special functions. Otherwise use generic.
- Bit Start and Bit Length: As per the CAN setup from the transmitting device. See CAN Message Format for details on determining the bit start and length.
- Scale: Enter the inverse if the original data has a scalar (e.g., multiply by 0.10 if the data is scaled up by 10)
- Offset: Enter the inverse of any offsets applied in the original data (e.g., if data adds 100, enter -100)
- Display Limits: Set to visualize the full range of values effectively (e.g., speed might be set from 0 to 140 mph). Tip it is possible to invert the graph by inverting the min and max values.
- Limits: Configure caution and critical limits for warnings (e.g., set 260 for caution and 300 for critical high temperatures)
Click “Set Values” to save your channel settings. Navigating to a different channel without saving will lose your settings.
Saving and Loading Configurations #
- After making changes, save your configuration frequently using
File > SaveorFile > Save As. - To load a configuration into the main application, follow the initial loading instructions.
CAN Message Formats #
Currently RaceRX is set listen to CAN messages that are sent in Big Endian format at 500Kbps.
Bit Start & Bit Length #
Due to the varying bit numbering schemes used by manufacturers when defining data fields in a CAN message, it’s not always straightforward to copy protocol information from other software into the Car Configurator tool. Instead, focus on the position of the bits within the full 64-bit packet, as shown in the image below. This table provides common bit start values for 8-bit, 16-bit, and 32-bit data channels.

For example, using Big Endian encoding:
- If Throttle Position is stored across bytes 2 and 3, the bit start will be 16, and the bit length will be 16.
- If Battery Voltage is stored in byte 7, the bit start will be 56, and the bit length will be 8.
The Car Configurator allows flexible configurations, meaning you can set any bit start or bit length values, as long as the data remains within the 64-bit packet. For example, you can create a channel with a bit start of 43 and a length of 3 if required.